US Guided Central Venous Catheter Kit Walk Through

This is a video from operator point of view of the placement of an ultrasound guided IJ central venous catheter.  The video uses a head mounted camera so there is a bit of movement so warning if you get motion illness early.

Yes I know, the bedside table had to be elevated for the camera angle and images so the edge of the kit wrapping relative to the drape is not ideal for sterile technique.

The video uses a Cook Spectrum antibiotic impregnated catheter with a Biopatch, chlorhexidine impregnated bandage.  Central line kits and contents will vary based upon manufacturer and customization.

Video provided for educational and informational purposes only.

I do not currently receive any funding or support from Cook or Biopatch.

Central Venous Catheter Task Trainer Phantom with Purple Vessels

If you are using task trainer procedural phantoms for ultrasound guided vascular access you may notice a problem over time.  The phantom vessels may start to be filled with purple fluid.  If you have blue and red liquid to differentiate the artery versus vein in the phantom there are 2 reasons you could have purple fluid.

  1. Aspiration of fluid from one vessel and re-injection into the other, mixing the red and blue to form purple.
  2. There is a fistulous connection between the artery and the vein.

If the purple fluid is due to aspiration and injection of fluid from one vessel into the other that is easy to fix.  Drain and refill the vessels with red and blue.  Then instruct your users not to re-inject the fluid in to the phantom vessel.  Instead dispense of the aspirate into a container on the side with a separate one for each color.  This will prevent mixing and injection of air in to the vessels leading to artifacts.  This will also prevent the accidental injection of fluid in to the phantom tissue itself which can damage the inserts and reduce the life of the phantom.  You can then inject the fluid through the fill port later.

The other reason is if you have a fistula between the vessels.  The following video shows what an aterio-venous fistula can appear like on the phantom with both an electronic and hand pump model.

One way to fix both problems is to fill the vessels with a single color fluid so if there is mixing or a fistula it won’t matter.

Instructional video for the Accucath by Vascular Pathways (Bard)

Originally Published: 2015-Apr-29

Since this was originally published the Accucath has become a Bard product.

As a disclaimer I do not currently receive any funding or support from Vascular Pathways (or Bard). The devices are purchased by the healthcare institution where I practice.

The Accucath device is a peripheral intravenous catheter that has an integrates coil tip wire to allow a seldinger type insertion technique.  Think of your arterial catheters.

Theoretically this would allow you easier placement in smaller and more difficult vessels.  It is also supposed to help you navigate through valves and avoid small side branches (all of which I have had experience with and it can be frustrating).  This is a newer device and I have had good success with smaller vessels, however, we will see what happens as more difficult access cases occur.

Below is an instructional video on using the Accucath 2.25″ device for venous access.

I tend to capture an image of the wire in the vessel and the catheter in the vessel if I am able to based on the clinical situation.  I also tend to document that the wire was removed intact, at least currently since this is a newer device in my institution.

Kyoto Kagaku US Guided PICC Phantom: Hands On

I got the chance to use and evaluate the Kyoto Kagaku Ultrasound guided Peripherally Inserted Central Catheter procedure phantom.  The phantom consists of a torso and an arm that articulates at the shoulder to be able to place the arm in different positions.

The upper arm has a replaceable area that can be ultrasounded and cannulated.  The targets are the cephalic and basilic veins.  The vessels outside of the insert are clear so you can see the wire and/or catheter threading. There is the ability to place the wire in to the SVC and the IJ.  There is a vessel that is used to fill the model and could be considered an azygos vein, but its take off is a little odd.

The video goes over the phantom’s parts and images along with demonstration of access and wire threading.

Disclosure: Phantom model was provided by Kyoto Kagaku for evaluation.

Central Line Kit Walkthrough and Line Placement

Originally Published: 2013-Jul-02

This video is a walk through of placing an ultrasound guided internal jugular central line in  a sterile fashion.  The technique and individual steps will depend on the brand of kit and how it has been customized for your institution.

This video was originally created as a review for the residents at my institution.  It focuses on the process of placing the line and less so on the ultrasound guidance.

Single Operator Sterile Sheathing of an Ultrasound Probe for an Ultrasound Guided Procedure

Originally published 2011-Mar-07

During the care of critically ill patients either in the Emergency Department or other settings can involve the placement of Central Venous Catheters.  The literature supports the use of Ultrasound Guidance to prevent mechanical complications and increase success rates.  However, in addition to mechanical complications the patients can be at risk for delayed complications such as central line associated blood stream infections, CLABSI, or line infections.

One method to reduce this is the use of full barrier sterile precautions.  This includes placing the ultrasound probe in a sterile sheath to allow real-time guidance and maintaining the sterile field.  Many sterile sheaths are not designed for a single operator placement in the way they are folded and packaged.  This has lead to frustration, loss of sterility, infamous gel accident stories, and a reliance on an assistant.  However, there is a method to sheath the probe and maintain the sterile field as a single operator.

The procedure can be broken down into the following steps:

  1. Place the probe upright in the holder
  2. Place adequate nonsterile gel on the probe surface
  3. Engage full barrier sterile precautions for the operator
  4. Open the sterile sheath and place on non-dominant hand
  5. Invert the sheath onto the dominant hand
  6. Grasp the top of the probe
  7. Unfurl the sheath onto the probe and cord
  8. Secure the sheath in place and smooth out air bubbles
  9. Place sterile gel on the sheath to allow imaging and procedural guidance

This was also published Academic Emergency Medicine in the Dynamic Emergency Medicine Section with an accompanying manuscript.  Trotter M, Nomura JT, Sierzenski PR. Acad Emer 2010;17:e153.

Tips and Tricks for Placement Confirmation of IJ Central Lines

Originally Published 2011-Jan-20

This is a short blurb that my colleagues and I wrote for the ACEP US Section Newsletter, January 2011 edition.

American College of Emergency Physicians Emergency Ultrasound Section Newsletter
Tips and Tricks Section January 2011

Christiana Care Health System Emergency Medicine Ultrasound Fellowship Program
DT Cook MD, JT Mink MD, JT Powell MD, PR Sierzenski MD RDMS, and JT Nomura MD RDMS

Placement of a central line is a common procedure in the resuscitation of critically ill patients in the Emergency Department. Real-time ultrasound guidance can reduce mechanical complications associated with central venous cannulation. This includes decreasing arterial puncture and increasing the rate of first pass success.

One complication of central venous catheter placement that may be detected by ultrasound guidance of vessel cannulation is misdirection of the catheter. We have all had internal jugular (IJ) catheters that travel into the subclavian or flip in a retrograde direction. We can employ ultrasound to gauge direction of the needle, location of the bevel and direction of the guidewire J-Tip.

When cannulating the IJ you can evaluate the placement of the guidewire to ensure it is placed correctly. The first step is to make certain that the wire has been placed in the IJ without puncture of the posterior wall. As described in several publications visualization of the wire should occur in a transverse and sagittal plane to ensure its location of prior to dilation.

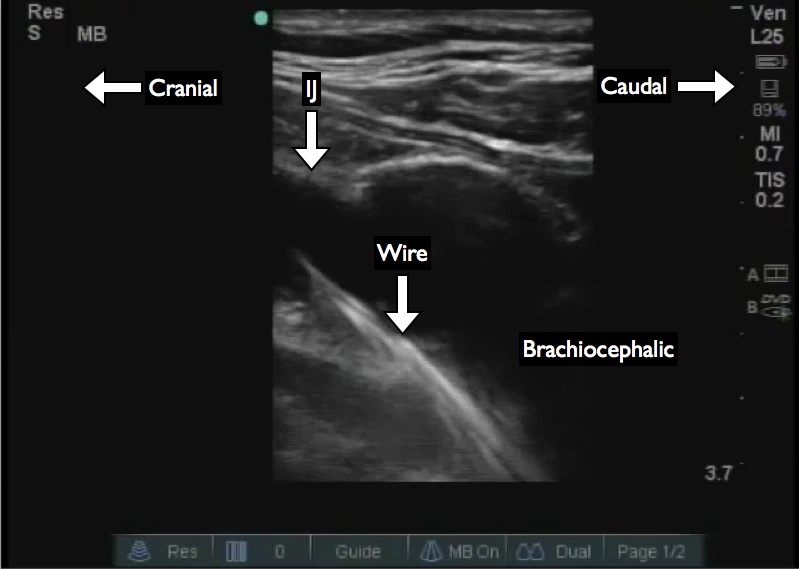
You can then angle the transducer and trace the IJ and wire to the brachiocephalic vein (Figure 1). Depending on the maximal depth and frequency of your probe you may or may not be able to visualize the superior vena cava. The next step is to evaluate the ipsilateral subclavian vein to ensure the wire is not directed laterally (Figure 2). You have now ensured that the wire is at least directed to the ipsilateral brachiocephalic.

If you prep widely enough you can also repeat this on the contralateral side to ensure that you have not directed the wire to the contralateral subclavian or IJ.

Figure 1: View of the wire in the brachiocephalic vein. This probe does not have a low enough frequency and maximal depth to adequately view the superior vena cava in this patient. The probe is placed lateral and posterior to the clavicular head of …

Figure 1: View of the wire in the brachiocephalic vein. This probe does not have a low enough frequency and maximal depth to adequately view the superior vena cava in this patient. The probe is placed lateral and posterior to the clavicular head of the sternocleidomastoid muscle and directed toward the contralateral nipple.

Figure 2: The subclavian artery and vein are visualized without wire present in the subclavian vein. The probe is placed superior the clavicle and lateral to the clavicular head of the sternocleidomastoid muscle.

Figure 2: The subclavian artery and vein are visualized without wire present in the subclavian vein. The probe is placed superior the clavicle and lateral to the clavicular head of the sternocleidomastoid muscle.